Friday, December 14, 2012

Displaying a MOC digitally....

One thing I get a little annoyed with is the inability of transporting any models to an event. Most of my equipment that I take is photography stuff, so unless I am bringing something small, I have to place a MOC in my luggage (not a really good idea) or not bring anything at all.

Since I ran into the realization above, I started thinking about other ways of displaying a MOC. Anyone who has gone to an event knows that seeing a model online is nothing compared to seeing a model for real. This is why I tend to spend my time looking at models at displays instead of online. Like sculpture, a MOC has to be experienced from all sides. This is a challenge to those who cannot bring a MOC for various reasons, and also to the fans who cannot go to events for one reason or another. How can a person display without MOCs?

It's a bit easier now with the arrival of smartphones and iPads. Digitally built MOCs can now be displayed with LDraw readers on tablets or phones. I use BrickPad on my iPad and iPhone. I have become more interested in digital display for a few reasons:

1. There is no lack of display space.
2. You can view from any viewpoint, including minifigure point of view.
3. You can manipulate the model and examine construction - BrickPad can display construction steps, and has been updated to do more.

There's a lot of potential here. Not only can a viewer see a model, he can move it, rotate it, even deconstruct it, which cannot be done at displays. This allows full interactivity with a model to see internal workings and tour a model from a minifig point of view.


This is a render of a file I built in Bricksmith.


Another angle. You can switch angles by finger swipes in BrickPad, so you can rotate the pahser in virtual space.
This allows a flexibility that didn't exist before. With virtual models, people can touch and break apart a MOC. 

You can get BrickPad free at iTunes here. I have a couple of MOCs in the library and plan to add more. My goal is to have a digital portfolio of my better MOCs to show at events. Other builders can showcase parts that people can't usually see, like an interior of a building.

And thank Kenrick Drew for making the app!

5 Steps to a Good MOC

I am in the midst of putting together a magazine, and I asked an interviewee how their design process is. How we design is a good indicator of our building experience and knowledge, so I mentioned possibly making a how-to on MOC building and I created an example, which you see below.

Please keep in mind this is a guideline, not a end-all procedure. In fact I would like to see how others build - it's fascinating to see how others make their MOCs.

Joe's 5 Steps to MOC Building (a constantly changing process, but this is the current version)

1. Get inspired. That doesn't mean going and copying a MOC you like, but studying and looking for things that fit your interests until you run into something that you want to build. That want will be the drive to make you build your best.

2. Study and Sketch. Look up and research ideas for your MOC. Look at other MOCs that you think may fit your idea. Sketch your model, either on paper or with LEGO elements.

3. Create and Sketch. Start thinking about the how and whys of your model - why does have long wings? Does it need more than one crew? Is it a transport or fighter? Figure a purpose to your model and work on your sketch. Your choices will affect your model. Embrace that by making a backstory.

4. Build and rebuild. The first iteration of a model is rarely the final iteration. Build and constantly evaluate the model for stability and as new parts become available, new building solutions. At this point building may become a one step up, one step back as components get rebuilt sturdier.

5. Finish and detail. Add details like color and decals and built detail. Building is like writing, except that you are visually making what you are thinking - "this is my green fighter/transport." What you  build from that simple description is going to be different from mine, but that is the great thing about building - it is your expression!

So what other steps and processes are there? What do you do?

Wednesday, August 8, 2012

The Hollywood Tower


Untitled, originally uploaded by jmenomeno.

Built by John Rudy - and is the Tower before it was struck by lightning! Below is one of the red trolley cars that is now running at California Adventure.

Lothlorien


Untitled, originally uploaded by jmenomeno.

Seen at Brickfair, this was an amazingly detailed landscape.

Monday, May 28, 2012

Monorails!

For the past year, I have been working on what is now called the Monorail Project. Kinda neat name with the idea of bringing in LEGO monorails back, with a twist. Instead of bringing back the old classic monorail, the Monorail Project is about creating a new system using off-the-shelf parts.

This approach was first pioneered by Masao Hidaka in Japan, and you can see his work here:


Besides the monorail, he has designed track and switches also:

 
Very clever building here. Masao bends bricks to make curves and switches, which means that the parts needed to make the track are no more than 2-wide bricks, plates, and tiles.

For those who are monorail junkies, you might recognize Masao's model as resembling the monorails at Tokyo Disneyland. I spotted that and started thinking about building my own monorail last year based on Disney World's Mark VI monorail:

Here's video for Red and then I built Blue:
and then a Mark VII from Disneyland:
All three have head/taillights and use the same track as developed by Masao.

Meanwhile, at the same time, Steven Walker in Washington was developing his own monorail, using the airliner fuselage and a different drive system:

A Flickr video can be seen here of his monorail. His track is much the same as Masao's, but his curved track is a stiffer design. One important thing that Steven's monorail has is a rear wheel caster that allows the monorail to take curves much smoother than my original design. Since then I have revised, and what was a pretty slow monorail has become a consistent moving train.

So there is an active research effort being done with the monorail. Brickbuilt monorails have been created in New York and in Florida.  However, a monorail that was presented at BrickMagic 2012 went a completely different direction.

Nathaniel Brill of PENNLug built a suspended monorail.

Using 4.5 v track (which are separate rail parts), Nate created a track that was light and strong. From there, he built a train that hangs from the track and runs on two contact points, reducing friction. And he did this in only a couple of days.

Here's a video:


Amazing and elegant work. And this appears to only be the beginning.

Friday, May 11, 2012

Building a Robot....

So I got to do a display last weekend, but I had to build a model for this. It was Free Comic Book Day and I decided to build Atomic Robo:

His writer was going to be at this event, and this was something I wanted to try anyways..a figure.

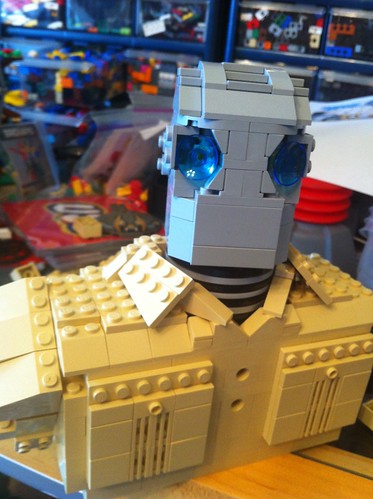
It took a couple of days of hammering at the head shape to get something - using SNOT mostly. After that, it was the neck and shoulders that were done. I followed the graphic above for the look:

Untitled 
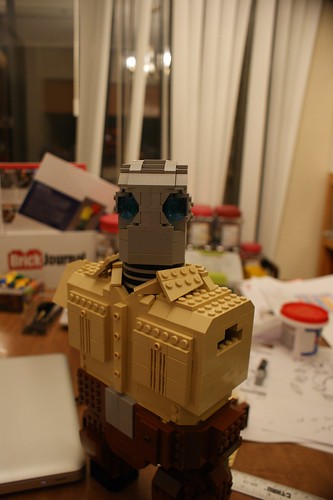
The collar was the thing I really wanted to work. After that, the pockets came into play, but those were pretty easy compared to the collar. The head originally had a round brick to slide  a flextube that held the neck in place, but I later made it so the head simply slid into the neck. Because of its looseness, the head can turn and pivot up and down slightly.

And the next week the model just sat for a week. Then it was mentioned to the organizers that this would be at the event, so Atomic Robo HAD to be finished...so...


Untitled 
His waist was worked on, and his legs started coming into shape.

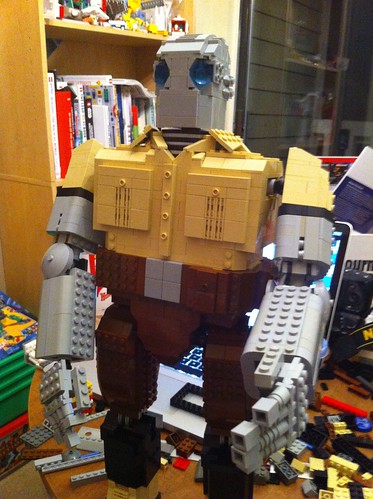
Here's where things get really tough. The hinges that LEGO has available are not meant for things like these. I had to figure out what hinges to use and how to optimize their strength. The newer large click swivels were used for the waist, elbow and shoulder joints. For the knees I used two technic click joints, and ended up with this:

Untitled 


The wrist is another click swivel, but the fingers are simple clip parts. The finger tips are bricks so I can use plates to make bent fingers if needed.

I liked him, but he looked incomplete. He needed a gun. However, having him hold a gun proved to be a real challenge - his balance standing straight is easy to manage. All the hinges are meant to stay straight - in this case straight vertical.

Take a look at this pic and I will tell you the various tricks I used to make this work:


Untitled 
1. The pose - I really didn't like the straight standing. So I had Atomic Robo stand on a raised hill. This affected the balance tremendously. The model was bent forward to make the balance work. And unseen here is that the boots only attach on a 2x4 brick. The shins protect the joints, which slide in. Yes, you can slide the him off the boots. I did that for portability.

2. The gun and arm - I originally made a big gun - a REAL big gun. But two issues came up - the weight threw the balance off. Way off. I had to cut the gun in half. I also had to secure the gun to the hand, so I rebuilt the hand and gun so the hand fit in it and the gun is attached to the inside of the elbow. The right arm is a gun/arm, and there is a lot of weight on it. So how does it stay?

3. A pistol?? - If you look under the arm, there is a pistol in holster. It's not really, but the holster is there. It turns out that if the joints were moved to a certain position, the arm would rest on the holster and be stable. Bt a solid bump would knock the arm off, and the gun would swing down and literally tear the arm off with its momentum, which would lead to complete collapse. That was solved by...

4. The OTHER arm - I wanted the other arm to hold the barrel anyways, so I built a quick attachment point in the hand to the barrel, and after some fumbling, I got them to meet and join. Both arms kept the gun in place and made for a very stable position.

5. Details - I am really proud of the grenades. Really. And the collar. And the head.

I tried to build this for travel, so the head is removable, the arms and legs are movable, and the body removes from the stand. Takes a little setup, but when done, he get a good impression:

even from Brian Clevinger, the writer of Atomic Robo!

Now to see if I can build another figure....and get the legs closer together...

Thursday, May 10, 2012

The Other Side of Making Things...

Okay, so I was on a soapbox about LEGO CUUSOO (more about the community than the site) on the previous blog post. Now I am going to another website where things seem to be a little clear-cut.

Kickstarter is a site where people can submit projects that can be funded. The threshold is determined by the project leaders, and the time limit is variable (I think). There are projects in every field, and there are a growing number of LEGO-related projects going online. Here are some projects worth note:

Little Guys...in Space! A LEGO® Fan Film from Paganomation - a film being proposed by David Pagano, a brick animator who was part of BrickJournal 14. This project is close to deadline, so if you want to support it, act soon!


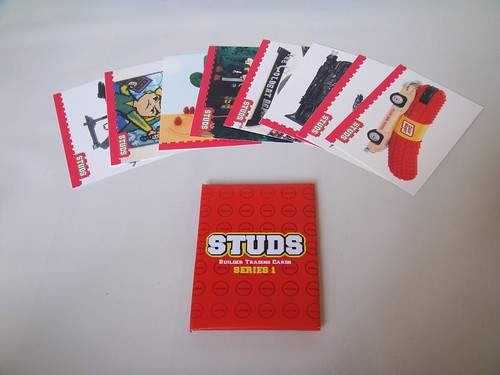
STUDS Collectible Cards - a set of trading cards proposed by Brandon Griffith, who was in BrickJournal 6. The cards are of AFOLs and community, and I was asked to be one of the cards as well as BrickJournal! I think this is a great idea, as these could be sold and and seen at events...how cool would that be?


I am a supporter of the above projects and encourage others to join. There's other projects too, so go look!

For me, the question I see here is whether or not the Kickstarter model of donating funding is a better model than the LEGO CUUSOO model of voting. There are pros and cons to either way:

LEGO CUUSOO:
Pros: 
1. Doesn't require any money.
2. Easy to vote.
3. Specifically LEGO, so a set would be an official LEGO set

Cons:
1. No guarantee of production, just review
2. No indication of practicality on a proposed set - a zillion part set isn't given any deference (when it should...any set over 1000 parts becomes a costly set, which I woudl think would make it harder to pass muster)
3. No real vestment by voters - when they say they will buy doesn't mean they will...

Kickstarter:
Pros:
1. Funders have a vested interest in success.
2. Easy to vote
3. Can be a LEGO-related item, not LEGO specific

Cons:
1. Funding may not be successful
2. Not official LEGO associated company
3. Need money to participate


So which one is better? Depends on what you want. If you want a set, LEGO CUUSOO is the only way to go, but it's tough. If you want something else, Kickstarter is a way to go that may not be as hard, depending on the funding target and the validity of the idea.


Thoughts?